Monday, 14 July 2014

Quick Send in Dynamics SL 2011

·         Microsoft Dynamics SL has a built-in feature called “Quick Send” that allows you to automatically send invoices and purchase orders via email and fax by using application server technology.

·         Also Electronic Documents Delivery giving users of sending statements, invoices, order confirmations, purchase orders and other customer and vendor related documents by using the application server technology, you can easily create a mail routing to quickly send documents.

·         You can also have an alert sent to your organization every time a quick send is triggered.

·         Before going to this Quick Send setup, configure the Application Server Setup steps in Dynamics SL 2011. Link is beneath


Quick send Setup

 Instigate Microsoft Dynamics SL à Foundation à shared Information àSetup à Quick send setup    (21.951.00)


 Document type:

Make a choice the listed document type, this document to be delivered electronically using Application server.

Project preference:
Quick Send Project preference for the Project Invoice and Construction Billing document types are defined for the project or the customer.

Delivery Method:
Delivery methods are Email and Fax. In which the Quick Send request will be sent.

Request Priority:
Processing of the document when sent electronically by the Application Server. Delivery priorities are High, Low, and Normal. 

Application Server:
Specified “your server name “application server to send the documents using quick send.

Notify sender by E-mail:
Message is sent to the user who sends a document electronically. The notification email includes a log of events that occurred while the Application Server processed the document. 


Notify Email Address:
Email address that receives the notification email issued by the Application Server.


Reply Email Address:
Email address used when a vendor, customer, employee, or project stakeholder replies to the email message that contains the document.

File Type:
File contains the document when it is sent electronically. File types for documents sent electronically via email or Text, Word, Crystal Reports, Excel, Adobe Acrobat, Rich Text, XML, and Comma-separated values. 

How to use Quick send option in Screen

1.      Create purchase order 


2.   Click vendor Id look up button  in purchase order screen (04.250.00) to invoke vendor maintenance screen (03.270.00)
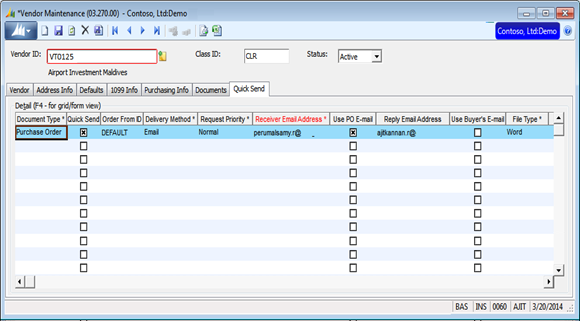

3.      In vendor maintenance screen (03.270.00) go to quick send tab to setup the quick send details for the particular vendor. If already quick send details has defined for the particular vendor ignore it.

4.      Click save and close vendor maintenance screen (03.270.00).

5.      Quick send options will enable in  purchase order screen (04.250.00)

6.      Click Quick send button popup message (Quick send entry created for this document) will invoke. Click OK

7.      Run the Application server outstanding requests will process also write a log
Microsoft Dynamics SL à Foundation à Application Server àProcesses à Application Server (96.010.00)


8.      Purchase order request process completed.

9.      if resend the particular documents again  using quick send inquiry ((21.200.00)
Microsoft Dynamics SL à Foundation à shared Information àinquiries à Quick send inquiry (21.200.00)


10.      Click Search/Refresh button it will load all Request. Select the particular document 

11.     Click Resend Requests to resubmit selected Quick Send requests for processing by the Application    Server using the Quick Send preferences defined for the recipient at the time the request was created.

12.  Click Edit Request to edit the Quick Send request in Edit Quick Send Requests (21.010.00).

Tuesday, 1 April 2014

Application Server Setup in Dynamics SL 2011

Before going to the set up an Application Server in Microsoft Dynamics SL 2011.

·         Check the Application Server email profile defined must be a valid Microsoft Exchange or Outlook.

·         If you plan to utilize the Application Server module to send email requests, be sure that Microsoft Visual Studio Tools for Office (VSTO) add-in is installed on the computer that has been designated as the Application Server.

·         Define a user ID and password for the Application Server (Application Server name - must be the same as a Solomon user ID ) on User Maintenance (95.260.00).

·         User ID has defined proper access right to the Application Server (96.010.00).

Application Server Setup Steps:

1.      Instigate Microsoft Dynamics SL à Foundation à Application Server àMaintenance à Application Server Administration Wizard (96.070.00)

2.      Click Next.

3.      Select user id of the Application Server displays or create a new User ID by clicking “Add user button”

Note: If the user id already defines in the Application Server name can’t view that particular Id to create another one.


4.      Click Next to continue.

5.      Type the number of the “polling interval”, in seconds, at Polling Interval (for example, type 3 the request queue every 3 seconds for new requests).

6.      Type the maximum number of requests (It allows up to 14) at “Maximum Requests Allowed”

7.      Type the Application Server’s email profile ID at “Email Profile ID”


      8.      Click Next.

9.      Enter Number of Entries; the maximum entries the Application Server should retain in the log before it begins overwriting log information.

10.      Enter Number of Days; specify the number of days should be maintained in the log.


11.      Click Next to continue.

12.      Enter Number of Days; Application server can automatically delete completed request from the queue.


13.      Click Next.

14.      Select “Report Routing options”

a.       Select “Delete non-Quick Send reports after they have been emailed” to delete report files immediately after they are sent via email to their recipients.

Note:  For historical intention, email messages containing documents associated with Quick Send requests (purchase orders, invoices, statements, order confirmations, shipping notices, or direct deposit advice slips) are not deleted.

b.      Select “keep the reports in the temporary directory” to maintain the results of a report request in the Application Server temporary file directory even after the reports have been sent via email to the correct recipients.

15.      Select “Process Email Requests”


16.      Click Next.

17.      Select Request Restart option.

a.      “Automatically resubmit incomplete requests” automatically resubmit incomplete requests for reprocessing.

b.      Select “Leave in queue and flag as ―Incomplete” incomplete status of the request and leave it in the request queue. The request can then be resubmitted or deleted from the Application Server Status (96.030.00) screen. 


18.      Click Next.

19.      Under Groups, select the check box for each Application Server group.

20.      Under Users, select the check box for each Application Server user. 


21.      Click Next.

22.      Select the check box for each group and user that will use this Application Server as their default Application Server.

23.      Click Finish.

Friday, 7 March 2014

Attachments Configuration in Dynamics SL 2011

Preface:
In the prior versions of Dynamic SL till SL 7.0, there is always a need to preserve the soft copy of the document pertaining to the transaction. This has been addressed in the latest 2011 versions through the document attachment feature.

   Ex:
     1.  Attach scanned copies of invoices from vendor to the voucher in the Voucher & adjustment screen.
     2.  Use it to attach a spreadsheet that you used to calculate the estimation of project in Dynamics.
     3.  Use it to attach copies of Signed Contracts to the project in project maintenance.
     4.  Multiple source document files can be attached.

It takes a little bit of set up to get to work, but once it is setup, it is very handy.

Attachments Configuration:

The source document files can be maintained from the SharePoint site or Network folder. If the source documents are detached, the files won’t be deleted from the external location. 

Source document files can be attached to data items by using the attachments option on the Notes/Attachments icon on data entry screens. 

The attachments should be configured in the Attachments Configuration screen of Dynamics SL and given below are the various routes.

    Open SL 2011 -> Administration -> Maintenance -> Attachments Configuration (98.400.00)

Upload Destinations Area

   a.  Existing Folder Location:


Select Existing Folder Location to store source document files on a network folder.

Click Browse button and select the path of the network folder. The path selected appears in UNC. Specify the full path of the network folder.

This option is not available if you select “Use Doc Share settings” or “Existing SharePoint Document  Library” option.

   b.  Existing SharePoint Document Library:


Select Existing SharePoint Document Library to store source document files on a SharePoint document library. Specify the Internet address of the SharePoint document library in URL.

This option is not available if you select “Use Doc Share Settings” or “Existing Folder Location” option. 


Tuesday, 4 February 2014

Changing to windows Authentication in SL 2011

When you change your Solomon authenticated type as Windows Login at that point enters the server information and user ID information for the first time login. 
Beneath steps to be follow the Windows Authentication setup for Dynamics SL 2011.
1) Open the OBDC Data Source Administrator from Control Panel-> Administrative Tools
2) Delete the existing ODBC connections for both Solomon Application and System databases if exists
3) Open the Microsoft Dynamics SL Database Maintenance (98.290.00) 
4) Connect the server using windows credentials
5) Go to the Update Database tab and select the appropriate SL System and Application databases
6) Click the Set Authentication Type button & select the Windows Authentication (recommended) option and click Ok
 7) Authentication mode, you have to assign SL users to their corresponding Windows user and click OK
8) When process is completed, launch Dynamics SL 2011 Fp1 with windows login credentials
Moreover, windows authentication you don't need to worry about restriction of multiple wrong passwords tries during SL/Window's login.

Wednesday, 1 January 2014

Manually Adding the Dynamics SL 2011 SDK Controls to the VS 2008 & 2010 Toolbox

Visual studio 2008 SL Date control  getting  from the following dll without any issues

Right-click in the toolbox and select Add Tab. Name it Dynamics SL.

Right-click in the new tab and Click Browse path to "C:\Program Files (x86)\Common Files\Microsoft Shared\DynamicsSL".

Select Interop.SAF.dll. Click Open (SL Date, SAFCheck, SAFCombo, SAFFloat, SAFGrid, SAFInteger, SAFMaskedText, SAFOption, and SAFUpdate) Click OK.

But  same thing I was thru in Visual studio 2010 .We can’t get SL Date Control . SL Date control won’t be available under the toolbox.

After analysis I am getting the date control 

Visual studio 2010  Adding the following dll files:

Right-click in the toolbox and select Add Tab. Name it Dynamics SL.

Right-click in the new tab and select Browse path to "C:\Program Files (x86)\Common Files\Microsoft Shared\DynamicsSL".

Select Interop.SAF.dll and Microsoft.SL.Controls.dll.

In Visual studio 2010, the SAFDate control is replaced by DSLDate in SL.

Click Open(Select DSLDate, QuickList, SAFCheck, SAFCombo, SAFFloat, SAFGrid, SAFInteger, SAFMaskedText, SAFOption, and SAFUpdate) Click OK.

The DSLDate and QuickList controls are in Microsoft.SL.Controls.dll,others are in Interop.SAF.dll.

Thursday, 19 December 2013

Add SSRS Report in Dynamics SL 2011Menu

This post is an effort to the various operating steps which helps to adding the SSRS Report under SL menu

   Step 1: Create New SSRS Report or use existing Report (.rdl) 

   Step 2: Include the report in SL root folder under Usr_Rpts

   Step 3: Open SL 11 -> Administration->Maintenance -> Report Control Maintenance  (98.300.00)

       Enter the Report information Report number, Report format name, Report format into the Report 
       Control  maintenance .


   Step 4:  Open SL 11 -> Administration->Maintenance -> Screen Maintenance (98.330.00)

       Enter the Report number, Report name, Module and Type 


   Step 5: Open SL 11 -> Administration->Maintenance -> Menu Maintenance (98.350.00)
  1. Select the relevant Group in “Menu for Group”.
  2. Select the Screens tab in the Menu Maintenance (98.350.00). 
  3. Select ALL- Show All Screen from the Drop-down “Show Screen Access for Group”.  This will show up all the SL screens in the Screens tab.
  4. Select the exact Report  from the Screens tab. Drag and drop the Report into the “Navigation pane work area” under  Inventory -> Report .
  5. After add the report to menu exactly as a normal crystal report,but rename  the program ROISRS.EXE replacing from ROI. EXE.Report as shown in the below figure. 
  6. Save and close the screen.


  Step 6:  Close the Solomon and launch it.

Tuesday, 10 December 2013

Dynamics SL Shortcut Keys

These shortcuts work in Dynamics SL:
  Are you using your F keys?  Some favorites:
F1 - Opens SL Help specific to the screen you are on
F2 - In a date field, brings up the relative period or relative date values; in a text field, allows enables cursor movement inside the field (including “Home” & “End”)
F3 - Opens PV list or the calendar on date fields.  If you prefer the mouse, double right click on the field.
F4 - Toggles between “Field View” and “Grid View” – i.e. change lines to grid and grids to line in your detail areas.  Double left click for the same results
F5 - Clears the value in a field
F6 - Insert Object wizard in Standard screen customization
F7 - Inserts today’s date in a date field
F9 - Opens “Yellow note” for editing 
F10 - focus on the Solomon Tool Bar
Alt + Ctrl + C - let's launches customize mode
ALT + F4 - Closes the active screen.
SHIFT+F3 - "Super" PV
SHIFT + F4 – Customized property browser for the selected control.
CTRL + S - Concluding error checks, save all changes in the current screen.
CTRL + E - Exports the grid detail to an Excel Workbook.
CTRL + HOME – Focus first segment of row in the Grid.
CTRL + END – Focus last segment of row in the Grid.