Sunday, 31 March 2013

Handling Crystal Reports in Dynamics SL

SL User is moving to Dynamics SL 2011 upgrading. Migrating customizations from SL 6.5 or SL 7.0 to SL 2011 has gone fine, on the other hand custom reports need an exact manner to ensure a smooth alteration. They can differ, but usually issues have to doReport Execution error messages when previewing a Report.

This concern is easily resolute by succeeding these steps:
  1. Open the problematic report in Crystal Reports
  2.  Go to the Database menu and select Set Data source Location

   3.  The Set Data source Location dialog opens. The top half is the current data source; the second is the  
    replacement data source. Each table and/or view involved in the report is listed at the top. If there are
 multiple instances of the same table, the Alias will appear before the table name in parenthesis. For
example, Ship Country (Country) – Country is the table name, Ship Country is the alias.   


4.  In the Replace with section, expand Create New Connection > ODBC
5.  When you expand ODBC, a list of data source names will appear, select the appropriate database, then press Next
6.  Enter the SQL Credentials press Finish.
7.  Select the first table/view on the Current Data Source and locate the matching table/view in the Replace With. Press Update.
8.  Repeat step 7 for ALL tables and views, including sub reports. Save the report and you will no longer see the error message! Before login Dynamics SL.


Tuesday, 5 March 2013

Customizations fail on 64-bit server

Issue:

Export the customization's on my development machine (32 bit). After import that customization's in  server (64bit). The customization's are in place and work as expected.

When the user closes the screen, then later opens the same screen errors begin to occur:


When this screen is closed "normal", non-customized version of the screen is loaded.

When the users closes Dynamics SL completely, then reopens SL, a different error is displayed when they try to open the same screen as before:


After clicks OK the screen will invoked and also working fine.

That problem does not occur on my development machine that is running windows 7 32 bit. It only appears to occur on the 64bit platform.

Solution:
  • Log off from Microsoft Dynamics SL.
  • Browse to the Microsoft Dynamics SL program files directory.                                                                               Path   C:\Program Files\Microsoft Dynamics\SL\Applications\
  • Locate the Solomon.ini file, and then open the file by using Notepad.
  •      In the Customization section of the Solomon.ini file, make the following change:
                     1.  There was not a [Customization] section in solomon.ini file, so added the following lines:
                                    [Customization]                                
                                          VBASourceCompile = Yes

  • Click Save, and then close Notepad.
After this change was made I restarted Dynamics SL on my 64-bit server system and all customization's appear to be working normally.


Sunday, 24 February 2013

Within SL include the Screen / Report through .INI file &. CRP file

INI file

  • An .Ini file is a text file with groups of keywords and variables also a way of storing data’s.
  • Using INI files execute the SQL table, Views, procedure, Index, Trigger show as fig (1). Also mention drive path, Folder & Password (Password should be the correct Windows login password) show as fig (2).
                                                                                       Fig (1)

                                                                                      Fig (2)

CRP file
  • You can only issue SELECT and INSERT statements. UPDATE and DELETE are not supported.
  • You can issue a CREATE TABLE statement but cannot specify a primary key, default value or foreign key constraints.
  • You cannot create Indexes. As a result, the queries take much longer to run.
  • You cannot create Triggers, Functions or Stored Procedures.


 Create an executable in a separate folder and place it in the Solomon root folder


Steps for Executing the Executable

  1. Open Database Maintenance (9829000.exe)
              a.  On the Top of the Connect Server tab, enter the SQL Server Name, Login and password.

              b.  Set the path of configuration file to: <Solomon Root folder>\ Executable\ AR Aged .Ini. Use 
                   Browse button to locate the file.

              c.  Click the Connect button. 


            Note: The Path and Database mentioned here in the screen shot is only for reference   
                         purpose (Locate the AR Aged.ini file using the browse button).

             d.  Now select the Update Database tab.

                     ->  Select the correct system database from the System Database name Combo box.

                     ->  Select the correct Application database(s) names from the Databases Rich text box.


                      ->  Select the “Install – AR Aged – Tables & view" in update scenario as shown in the figure
                          below and also .INI file Template mention in figure (1).

                      ->  Click “Update Database” button

                      ->  If the system asks crenditals, enter it and click OK. Refer figure below.


      ->  Click the Ok button of the message “Database update process complete”


      ->  Close the Database maintenance screen with the Close button.

     2.  UPDATING DATABASE with DB Update.

             a.  Launch Solomon

             b.  Enter the Server name and the correct system database name in the Find Database (98.000.01)
                  as below.

             c.  Click OK to Login

             d.  In Solomon menu, Administration -> select Utility-> DB Update.

             e.  Select the appropriate Application Database(s).

             f.   Select the Drive from the Drive combo box where the delivery file is located.

             g.  From the Files Rich text box, select the following files.

                                Insert screen. CRP

             h.  Click Begin Processing.

                  Note: Refer the picture below for the Database update operation. The Path mentioned here in
                            the screen shot is only for reference purpose


     3.  Copy the Report (08500dp) from Executable folder and placed into the Usr_rpts.

     4.  Close the Solomon and Reopen it.
  

Monday, 18 February 2013

Upgrading issue - Visual Basic 6 Project to Visual Studio.NET Project

When i am trying upgrade my VB 6 Project to Visual Studio 2005.NET, i encountered an error saying

"Upgrade failed: Exception Occured : Could not load referenced component MSCOMCT2.OCX(2.0.0)
You need to install this component before u upgrade the project."


Solution:
  • Install .ocx component
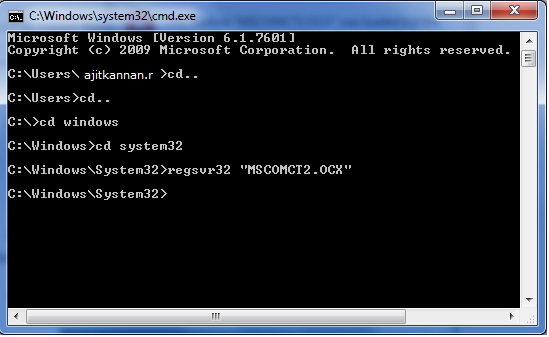
  • Open command pro
                  REGSVR32 "C:\Windows\System32\MSCOMCT2.OCX"

                                                                                (OR)
  • Run the project in already installed vb.6.5 machine. Because 6.5 version  have MSCOMCT2.OCX.ocx file.


Thursday, 4 October 2012

Management Reporter

Introduction :

        Management Reporter is a real-time financial reporting application designed to empower information         
        workers too quickly and easily create, generate, secure, and publish financial statements, such as Profit 
        and Loss (P&L) statements, balance sheets, Trial balance and Income statement. 

Why Customers Are Moving to Management Reporter (MR)


Though FRx is already an effective Management Reporting tool, there are lot of advantages of using MR than FRx that are listed below.
  • MR is much easier to support since it is much more current technology.  The look and feel of the software is very similar to other Microsoft products which should be easy for the user to learn and use.
  • Report Server in MR is useful to publish your reports to a web server and all users can view, print and Export to Excel.
  • The underlying Database in MR is SQL Server, the best database solution from Microsoft providing the enhanced stability to the solutions where FRx is using Access as the database.
  • MR allows for “undo” when you make a mistake editing a row, column, or tree. The error correction is not easy in FRx compared to MR.
  • MR publishes reports to SharePoint in a seamless manner and with less effort once MR is configured which is not possible with FRx.
  • Stress key numbers to highlight the numbers which is in negative and turns those numbers into red which is a key feature with MR.
  • Personalized reports as per the company standards to include the Logos & Graphs is a feature of MR

Key Features

  1. Easy creation and customization
  2. Advanced financial intelligence
  3. Multiple ways to access reports

Client Workstation Requirements


Step's for Installing MR Version - 2.1


Server Installation

     1.  Run the  setup
     2.  Check the check box ( I accept the terms in the  license agreement)
     3.  Click Next
     4.  Browse your path (C:\Program Files\Microsoft Dynamics ERP\Management Reporter\2.1\)
     5.  Click Next , Click Install
     6.  Check the Check box ( Start the configuration console to continue)
     7.  Click Finish
     8.  Check the Check box ( Add Microsoft dynamic SL)


     9.  Click Next

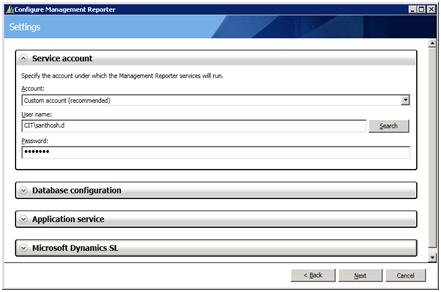
Service Account 

       You must specify the account under which the services will run.  In my example, I simply used my own 
       domain account, although you may prefer to use a different account.  If you enter a specific account, you 
       will have to provide the password for that domain account.


Database Configuration

        Enter the name of SQL Server database server on which the MR Database will be created, then enter 
        credentials that can be used to create the database. The specified user must be a member of the sys-
        admin role on the SQL Server.


Application service

       The Management Reporter application service will be configured to use the following port. Leave the
       default port or type a new port.


Microsoft Dynamic SL

        Enter the name of SQL database server, and then enter SQL (or) Windows credentials. Database
        automatically listed.


   10.  Click Next
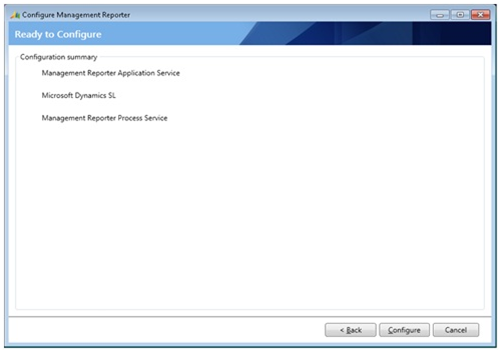
   11.  Click Configure


   12.  When the data provider is successfully configured, click Close


   13.  Start menu -> Click (configuration console) 
   14.  Select your database, click import.


   15.  Enter your login credentials , Click ok
   16.  If you don't want the companies that are showing in the screen just check skip Check box.


                       Click Import companies, a message box will pop up , click ok then closes.

Client Installation

  1. Run the  setup 
  2. Check the check box ( I accept the terms in the  license agreement)
  3. Click Next
  4. Browse your path (C:\Program Files\Microsoft Dynamics ERP\Management Reporter\2.1\)
  5. Enter Server name: port (http://solomon-2011:4712)
  6. Click Next , Click Install
  7. Click Finish
  8. Start menu -> Click (Report Designer)  -> Click Yes
  9. Choose the  company , click Set As Default


Note: If you use SQL authentication, uncheck the Windows authentication check box, specify the Microsoft    
          Dynamics SL user name and password

     10.  Enter your login credentials , Click ok

Creating a new report using Report Wizard


    Given below are the procedures to create a new report by using the Report Wizard:
  •  On the Tools menu, click Report Wizard
                                      (Or)
                     Click Report Wizard icon.
  • On the Getting Started page, do the following:
            -->  In the Report Template list following

                     1.  Balance Sheets – current and YTD
                     2.  Income Statements – Rolling Quarter
                     3.  Income Statements – Actual vs. Budget
                     4.  Monthly Trial Balance
                                 Click any one of the radio button. 

              -->  Actual book code list, Select a choice.
              -->  Click Next.

  • On the Define Your Report Sections page, do the following:
                     1.  In the Report section list, click a section of the report.
                     2.  Select one or more segment values, and then click Add.
                     3.  Click Next
                     4.  On the Reorder and Edit Your Report Sections page, click next.
                     5.  On the Format and Preview Your Report page, click next.
                     6.  On the Choose Your Report Structure page, select Create one report for the entire 
                          entity, and then click next.

  • On the Name and Generate Your Report page, do the following:
                     1.  In the Name box, type a name for your report.
                     2.  Select the Generate this report after the wizard closes check box.
                     3.  In the Period box, choose the period.
                     4.  In the Year box, choose the Year.
                             The report date changes to reflect the specified period and year.
                     5.  Click Next
                     6.  On the Completing the Report Wizard page, review the report
                             Definition settings, and then click Finish
                     7.  Click Ok
                     8.  Click Generate
                     9.  A sample Report will appear within few moments.